
TableView

테이블 뷰를 선택해서 만들 수 있다.
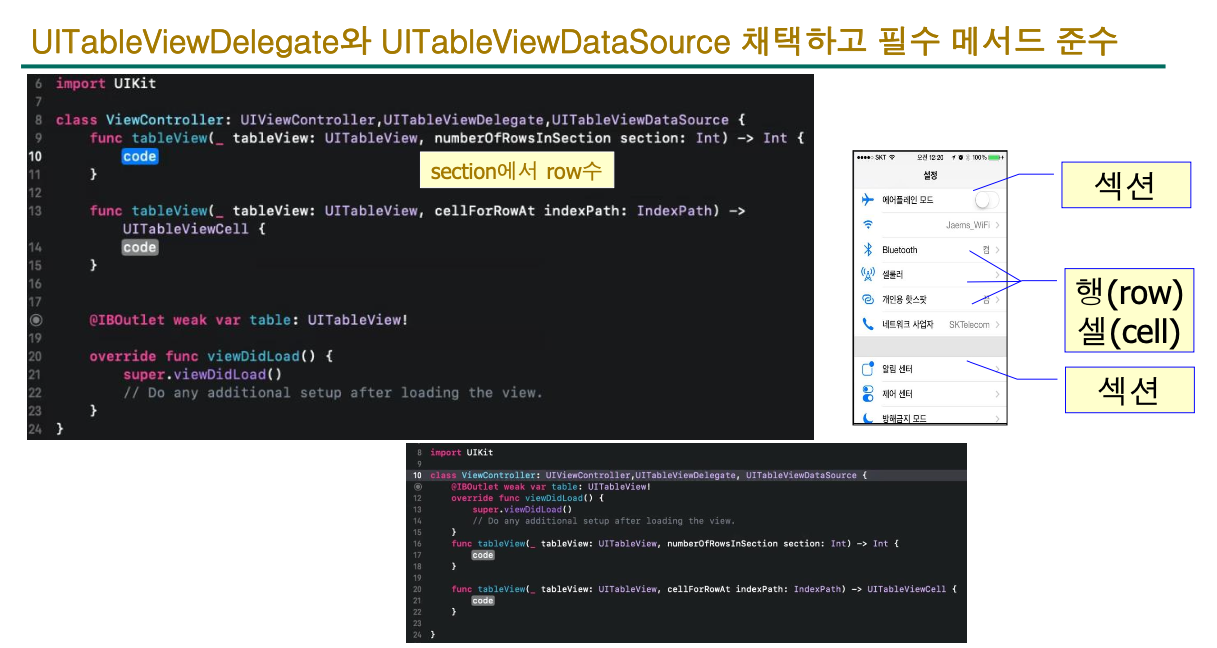
하나의 그룹을 섹션이라고 하고 안의 내용을 행 또는 셀이라고 한다.

셀의 스타일과 식별자명을 지정할 수 있다.

https://developer.apple.com/documentation/uikit/uitableviewcell/cellstyle
UITableViewCell.CellStyle | Apple Developer Documentation
An enumeration for the various styles of cells.
developer.apple.com
func tableView(_ tableView: UITableView, cellForRowAt indexPath: IndexPath) -> UITableViewCell {
    let cell = UITableViewCell.init(style: .subtitle, reuseIdentifier: "myCell")
    cell.textLabel?.text = indexPath.description
    cell.detailTextLabel?.text = "\(indexPath.row)"
    cell.imageView?.image = UIImage(named: "3.png")
    return cell
}
이렇게 텍스트나 이미지를 지정해서 출력하도록 할 수 있다.

import UIKit

let image = ["1.png", "2.png", "3.png", "4.png", "5.png"]
let name = ["식당1", "식당2", "식당3", "식당4", "식당5"]

class ViewController: UIViewController, UITableViewDelegate, UITableViewDataSource {
    @IBOutlet weak var table: UITableView!

    func numberOfSections(in tableView: UITableView) -> Int {
        return 3
    }

    func tableView(_ tableView: UITableView, numberOfRowsInSection section: Int) -> Int {
        return 5
    }

    func tableView(_ tableView: UITableView, cellForRowAt indexPath: IndexPath) -> UITableViewCell {
        let cell = UITableViewCell.init(style: .subtitle, reuseIdentifier: "myCell")
        cell.textLabel?.text = name[indexPath.row]
        cell.detailTextLabel?.text = "\(indexPath.row)"
        cell.imageView?.image = UIImage(named: image[indexPath.row])
        return cell
    }

    override func viewDidLoad() {
        super.viewDidLoad()
        table.delegate = self
        table.dataSource = self
        // Do any additional setup after loading the view.
    }
}

배열로 선언한 상수의 값을 사용하여 서로 다른 내용이 나오도록 하였다.
Cell 직접 만들기

애플에서 제공하는 4개의 디자인은 기본적인 것밖에 없기 때문에 TableViewCell을 이용하여 커스텀 Cell을 만들 수 있다.
Identifier를 적어주면 왼쪽의 Table 아래의 이름이 같이 변경된다.
이걸 적어주어야 나중에 가져와서 사용할 수 있다.

새로 Cell을 위한 클래스를 만들었다.

Identity inspector에서 새로 만든 클래스를 연결해주어야 한다.

AutoLayout Constraint를 적용하면 왼쪽의 창을 보면 같은 레벨에 적용된 Constraint를 확인할 수 있다.

!중요!
cell의 myLabel을 가져오려고 했는데 안 된다. 그 이유는 dequeueReusableCell()의 리턴 타입은 UITableViewCell이기 때문이다. 직접 만든 클래스는 UITableViewCell의 자식이다.

이런식으로 as!나 as?를 이용해서 다운캐스팅을 해야 한다.


func tableView(_ tableView: UITableView, cellForRowAt indexPath: IndexPath) -> UITableViewCell {
//        let cell = UITableViewCell.init(style: .subtitle, reuseIdentifier: "myCell")
//        cell.textLabel?.text = name[indexPath.row]
//        cell.detailTextLabel?.text = "\(indexPath.row)"
//        cell.imageView?.image = UIImage(named: image[indexPath.row])
    let cell = tableView.dequeueReusableCell(withIdentifier: "myCell",
                                             for: indexPath) as! MyTableViewCell
    cell.myLabel.text = indexPath.description
    print(indexPath.description)
    return cell
}
dequeueReusableCell()을 이용하면 화면에 보이는 부분의 Cell만 실시간으로 만들어낸다.
print()로 확인해보면 화면을 내리고 올릴 때마다 값이 새로 출력되는 것을 볼 수 있다.

didSelectRowAt이 있는 메서드는 셀을 클릭했을 때 호출되는 메서드이다.
func tableView(_ tableView: UITableView, didSelectRowAt indexPath: IndexPath) {
    print(indexPath.description)
}

이렇게 Cell을 누르면 출력되도록 할 수 있다.
import UIKit

// 이미지와 식당 이름을 담은 배열 선언
let image = ["1.png", "2.png", "3.png", "4.png", "5.png"]
let name = ["식당1", "식당2", "식당3", "식당4", "식당5"]

// UIViewController를 상속받고, UITableViewDelegate와 UITableViewDataSource 프로토콜을 준수하는 ViewController 클래스 정의
class ViewController: UIViewController, UITableViewDelegate, UITableViewDataSource {

    // Interface Builder에서 연결한 테이블 뷰
    @IBOutlet weak var table: UITableView!

    // 테이블 뷰의 섹션 수를 정의하는 메서드, 여기서는 5를 반환
    func numberOfSections(in tableView: UITableView) -> Int {
        return 5
    }

    // 각 섹션의 행 수를 정의하는 메서드, 여기서는 모든 섹션에 대해 5를 반환
    func tableView(_ tableView: UITableView, numberOfRowsInSection section: Int) -> Int {
        return 5
    }

    // 테이블 뷰의 각 행에 대한 셀을 구성하는 메서드
    func tableView(_ tableView: UITableView, cellForRowAt indexPath: IndexPath) -> UITableViewCell {
        // "myCell" 식별자를 가진 셀을 재사용 큐에서 가져옴
        let cell = tableView.dequeueReusableCell(withIdentifier: "myCell",
                                                 for: indexPath) as! MyTableViewCell
        // 셀의 레이블에 indexPath의 설명을 표시
        cell.myLabel.text = indexPath.description
        return cell
    }

    // 사용자가 특정 행을 선택했을 때 실행되는 메서드, 선택된 행의 indexPath를 콘솔에 출력
    func tableView(_ tableView: UITableView, didSelectRowAt indexPath: IndexPath) {
        print(indexPath.description)
    }

    // 뷰 컨트롤러의 뷰가 메모리에 로드된 후 호출되는 메서드
    override func viewDidLoad() {
        super.viewDidLoad()
        // 테이블 뷰의 delegate와 dataSource를 현재 뷰 컨트롤러(ViewController 클래스의 인스턴스)로 설정
        table.delegate = self
        table.dataSource = self
    }
}

// 주석 처리된 부분은 다른 방식으로 셀을 생성하고 구성하는 예시 코드입니다.
// UITableViewCell의 인스턴스를 직접 생성하고, 셀의 텍스트 레이블, 세부 텍스트 레이블, 이미지 뷰에 내용을 설정하는 방식이지만,
// 실제 사용되는 코드에서는 커스텀 셀(`MyTableViewCell`)을 사용합니다.
// 주석 처리된 부분:
// let cell = UITableViewCell.init(style: .subtitle, reuseIdentifier: "myCell")
// cell.textLabel?.text = name[indexPath.row]
// cell.detailTextLabel?.text = "\(indexPath.row)"
// cell.imageView?.image = UIImage(named: image[indexPath.row])

Stack View를 선택하면 AutoLayout을 간편하게 설정할 수 있다.

만약 내용이 길어서 ...으로 축약되어 나타난다면 Auto Shrink와 Lines를 적절히 조절하면 글자 크기가 자동으로 조절된다.

class MyTableViewCell: UITableViewCell {
    @IBOutlet weak var myLabel: UILabel!
    @IBOutlet weak var salesAmt: UILabel!

    override func awakeFromNib() {
        super.awakeFromNib()
        // Initialization code
    }

    override func setSelected(_ selected: Bool, animated: Bool) {
        super.setSelected(selected, animated: animated)

        // Configure the view for the selected state
    }

}
func tableView(_ tableView: UITableView, cellForRowAt indexPath: IndexPath) -> UITableViewCell {
    let cell = tableView.dequeueReusableCell(withIdentifier: "myCell",
                                             for: indexPath) as! MyTableViewCell
    cell.myLabel.text = name[indexPath.row]
    cell.salesAmt.text = "\(salesAmt[indexPath.row])"
    // print(indexPath.description)
    return cell
}ㄴ ViewController
salesAmt를 추가해서 Stack View로 위치를 잘 설정한 후 실행해 보았다.
다운캐스팅(Downcasting)
func tableView(_ tableView: UITableView, cellForRowAt indexPath: IndexPath) -> UITableViewCell {
//        let cell = UITableViewCell.init(style: .subtitle, reuseIdentifier: "myCell")
//        cell.textLabel?.text = name[indexPath.row]
//        cell.detailTextLabel?.text = "\(indexPath.row)"
//        cell.imageView?.image = UIImage(named: image[indexPath.row])
    let cell = tableView.dequeueReusableCell(withIdentifier: "myCell",
                                             for: indexPath) as! MyTableViewCell
    cell.myLabel.text = name[indexPath.row]
    cell.salesAmt.text = "\(salesAmt[indexPath.row])"
    // print(indexPath.description)
    return cell
}
주석에서는 cell의 프로퍼티에 접근할 때 ?로 옵셔널체이닝을 사용했는데 밑에서는 사용하지 않은 이유가 클래스를 정의한 부분에서 ! 옵셔널로 설정해주었기 때문이다. 그래서 사용하는 시점에 자동으로 언래핑해줘서 ?를 사용하지 않아도 되는 것이다.


// 기본 Animal 클래스 정의
class Animal {}

// Animal 클래스를 상속받는 Dog 클래스 정의
class Dog : Animal {}

// Dog 타입의 인스턴스를 생성하고 myDog 변수에 할당
let myDog : Dog = Dog()

// 업캐스팅: Dog 인스턴스를 Animal 타입으로 취급하여 myAnimal 변수에 할당
let myAnimal : Animal = myDog
// 이 과정에서 모든 Dog(강아지)는 Animal(동물)이라는 개념이 적용됩니다.

// 안전한 다운캐스팅 예제 시작
// Dog 인스턴스를 생성하고 이를 Animal 타입으로 취급하여 someAnimal 변수에 할당
let someAnimal: Animal = Dog()
// 이 시점에서 someAnimal은 Animal 타입이지만 실제로는 Dog 인스턴스를 가리킵니다.

// someAnimal의 타입을 출력 (결과는 Dog)
print(type(of:someAnimal))

// as? 연산자를 사용해 someAnimal을 Dog 타입으로 안전하게 다운캐스팅하고 결과를 x에 할당
let x = someAnimal as? Dog
// as? 는 다운캐스팅이 실패할 경우 nil을 반환하는 옵셔널 타입으로 결과를 제공합니다.
// 여기서는 성공적으로 다운캐스팅되어 x는 Dog 타입의 옵셔널입니다.

// x의 타입을 출력 (결과는 Optional<Dog>)
print(type(of:x))

// if let 구문을 사용해 someAnimal을 Dog 타입으로 안전하게 다운캐스팅 시도
if let someDog = someAnimal as? Dog {
    // 다운캐스팅 성공 시, someDog의 타입을 출력 (결과는 Dog)
    print(type(of:someDog))
} else {
    // 다운캐스팅 실패 시, "Downcasting실패" 출력
    print("Downcasting실패")
}

// 강제적인 다운캐스팅 예제 시작
// as! 연산자를 사용해 someAnimal을 Dog 타입으로 강제 다운캐스팅하여 anotherDog에 할당
let anotherDog = someAnimal as! Dog
// as! 는 다운캐스팅이 실패할 경우 런타임 오류를 발생시킵니다. 여기서는 성공적으로 다운캐스팅됩니다.

// anotherDog의 타입을 출력 (결과는 Dog)
print(type(of:anotherDog))
// someAnimal이 실제로 Dog 인스턴스이기 때문에 다운캐스팅은 성공하고, 런타임 오류는 발생하지 않습니다.
as? 는 안전한 다운캐스팅이고 as!는 강제 다운캐스팅이다.
보통 다운캐스팅되지 않는 것에 사용하는 경우는 적겠지만 그래도 안전하게 Optional로 결과를 받기 위해 as?를 사용할 수도 있다.
앞에서 살펴보았던
위 함수는 리턴 타입이 커스텀한 클래스의 부모 클래스이므로 자식 클래스에서 내가 직접 설정한 변수들을 사용하려면 자식 클래스 타입으로 다운캐스팅해야 한다.
옵셔널 (Optional)

옵셔널을 그냥 사용하려고 하면 오류가 발생하는데 !로 강제 언래핑이나 ?로 옵셔널 체이닝하는 방법으로 해결할 수 있다.

!로 강제 언래핑하면 잘 되지만 ?로 옵셔널 체이닝을 사용했을 때는 Optional(25)라고 감싸져서 나왔다.

옵셔널 체이닝을 사용할 때도 !로 강제 언래핑을 할 수 있지만 언래핑이 실패할 수도 있으므로 옵셔널 바인딩을 이용하는 것이 좋다.
var x : String? // = "Hi"//Hi지우고도 실습 print(x, x!)
if let x {
    print(x)
}

let b = x!.count
print(type(of:b),b)

let b1 = x?.count
print(type(of:b1),b1, b1!)

let c = x ?? ""
print(c)
초기값이 nil인 경우 옵셔널 체이닝이 유용하다. !로 강제 언래핑하면 오류가 발생하지만 옵셔널 체이닝은 nil을 잘 반환해준다.
// 옵셔널 String 타입의 변수 x를 선언하고 초기값을 주지 않음.
var x : String? // = "Hi" // 여기서 "Hi"는 주석 처리되었으므로, x는 nil 값을 가지게 됩니다.

// 옵셔널 x와 강제 언래핑된 x를 출력하는 시도.
// x는 nil이므로, x를 그대로 출력할 때는 nil이 출력됩니다.
// x! (강제 언래핑)을 시도할 경우, x가 nil이기 때문에 런타임 오류가 발생합니다.
print(x, x!) // 여기서 런타임 오류 발생

// if let 구문을 사용하여 x의 값이 nil이 아닌 경우에만 x를 언래핑하고 그 값을 출력합니다.
// x가 nil이므로, 이 코드 블럭은 실행되지 않습니다.
if let x {
    print(x)
}

// 강제 언래핑을 사용하여 x의 count 속성에 접근하려고 시도합니다.
// x가 nil이므로, 이 행에서 런타임 오류가 발생합니다.
let b = x!.count
// b의 타입(Int)과 값을 출력하는 코드입니다.
print(type(of:b),b)

// 옵셔널 체이닝을 사용하여 x가 nil이 아닐 경우에만 count 속성에 접근하고 그 결과를 b1에 할당합니다.
// x가 nil이므로, b1 역시 nil이 됩니다.
let b1 = x?.count
// b1의 타입(Optional<Int>)과 값을 출력합니다. 결과는 nil입니다.
print(type(of:b1),b1)

// nil 병합 연산자(??)를 사용하여 x가 nil일 경우 빈 문자열("")을 c에 할당합니다.
// x가 nil이므로, c는 빈 문자열이 됩니다.
let c = x ?? ""
// c를 출력합니다. 결과는 빈 문자열입니다.
print(c)'공부 > Swift' 카테고리의 다른 글
| [iOS][8, 9주차] 영화진흥위원회 오픈API 사용하기 (0) | 2024.05.02 |
|---|---|
| [iOS][7주차] 지난 과정 & 문법 복습 (2) | 2024.04.18 |
| [iOS][5주차] Swift 문법 복습 / TableView (0) | 2024.04.04 |
| [iOS][3&4주차] 간단한 앱 만들기, 문법 복습 (0) | 2024.03.28 |
| [iOS][2주차] 스위프트 복습 (0) | 2024.03.14 |